|
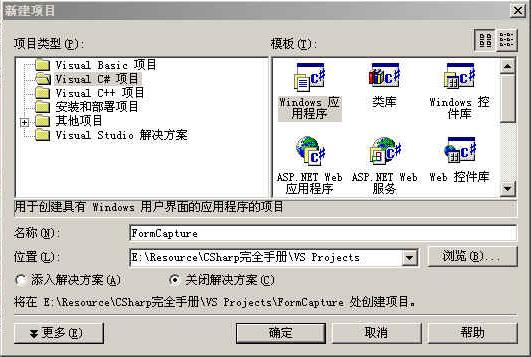 2. 布置主窗体: 在窗体上添加一个图片框(pictureBox)控件以及一个按钮(button)控件即可。将主窗体的Text属性设置为“屏幕捕捉程序”;将图片框的Image属性设置为一个图形文件;将按钮的Text属性设置为“屏幕捕捉”即可。(当然读者可以添加自己需要的控件来布置主窗体)图示如下: 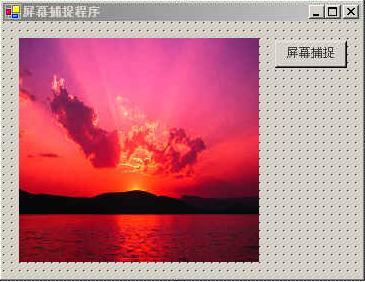 3. 代码编写: 先在代码文件中添加上面介绍的BitBlt函数的外部声明。 再添加按钮的OnClick事件处理函数,该函数就是实现屏幕捕捉的主要部分了。函数如下: private void button1_Click(object sender, System.EventArgs e) { Graphics g1 = this.CreateGraphics();//获得窗体图形对象 Image MyImage = new Bitmap(this.ClientRectangle.Width, this.ClientRectangle.Height, g1); Graphics g2 = Graphics.FromImage(MyImage);//创建位图图形对象 IntPtr dc1 = g1.GetHdc();//获得窗体的上下文设备 IntPtr dc2 = g2.GetHdc();//获得位图文件的上下文设备 BitBlt(dc2, 0, 0, this.ClientRectangle.Width, this.ClientRectangle.Height, dc1, 0, 0, 13369376);//写入到位图 g1.ReleaseHdc(dc1);//释放窗体的上下文设备 g2.ReleaseHdc(dc2);//释放位图文件的上下文设备 MyImage.Save(@"c:\Captured.jpg", ImageFormat.Jpeg);//保存为jpeg文件 MessageBox.Show("保存图片结束!"); } 4.到此为止,程序已经做完了。按Ctrl+F5可以试试效果如下图: 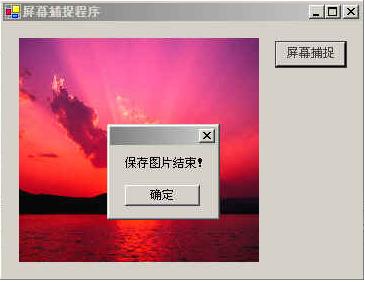 图片已经保存好了,看看屏幕捕捉的结果吧(如下图)!  不过,这个程序只是捕捉到了程序自身的客户区,所以功能有限。当然,你也可以试着做个捕捉屏幕任何位置的程序!你只要改变源图像的宽度和高度即可,而这个宽度和高度当然可以由用户来选定。这样,一个自制的屏幕捕捉程序就出炉了。 从上面的实例中,我们不难发现用C#编程实现一些基本功能还是非常容易的,真可谓是高效开发的好工具。所以,笔者希望有更多的人加入C#的行列,开发出更实用、更完善的软件。 完整代码: using System; using System.Drawing; using System.Collections; using System.ComponentModel; using System.Windows.Forms; using System.Data; using System.Drawing.Imaging; namespace FormCapture { /// /// Summary description for Form1. /// public class Form1 : System.Windows.Forms.Form { private System.Windows.Forms.PictureBox pictureBox1; private System.Windows.Forms.Button button1; /// /// Required designer variable. /// private System.ComponentModel.Container components = null; public Form1() { // // Required for Windows Form Designer support // InitializeComponent(); // // TODO: Add any constructor code after InitializeComponent call // } /// /// Clean up any resources being used. /// protected override void Dispose( bool disposing ) { if( disposing ) { if (components != null) { components.Dispose(); } } base.Dispose( disposing ); } #region Windows Form Designer generated code /// /// Required method for Designer support - do not modify /// the contents of this method with the code editor. /// private void InitializeComponent() { System.Resources.ResourceManager resources = new System.Resources.ResourceManager(typeof(Form1)); this.button1 = new System.Windows.Forms.Button(); this.pictureBox1 = new System.Windows.Forms.PictureBox(); this.SuspendLayout(); // // button1 // this.button1.BackColor = System.Drawing.SystemColors.ActiveBorder; this.button1.ForeColor = System.Drawing.SystemColors.ControlDarkDark; this.button1.Location = new System.Drawing.Point(272, 19); this.button1.Name = "button1"; this.button1.Size = new System.Drawing.Size(72, 27); this.button1.TabIndex = 4; this.button1.Text = "屏幕捕捉"; this.button1.Click += new System.EventHandler(this.button1_Click); // // pictureBox1 // this.pictureBox1.Image = ((System.Drawing.Bitmap)(resources.GetObject("pictureBox1.Image"))); this.pictureBox1.Location = new System.Drawing.Point(16, 16); this.pictureBox1.Name = "pictureBox1"; this.pictureBox1.Size = new System.Drawing.Size(240, 224); this.pictureBox1.SizeMode = System.Windows.Forms.PictureBoxSizeMode.StretchImage; this.pictureBox1.TabIndex = 0; this.pictureBox1.TabStop = false; // // Form1 // this.AutoScaleBaseSize = new System.Drawing.Size(6, 14); this.ClientSize = new System.Drawing.Size(358, 255); this.Controls.AddRange(new System.Windows.Forms.Control[] { this.button1, this.pictureBox1}); this.KeyPreview = true; this.Name = "Form1"; this.Text = "屏幕捕捉程序"; this.ResumeLayout(false); } #endregion [System.Runtime.InteropServices.DllImportAttribute("gdi32.dll")] private static extern bool BitBlt( IntPtr hdcDest, //目的DC的句柄 int nXDest, //目的图形的左上角的x坐标 int nYDest, //目的图形的左上角的y坐标 int nWidth, //目的图形的矩形宽度 int nHeight, //目的图形的矩形高度 IntPtr hdcSrc, //源DC的句柄 int nXSrc, //源图形的左上角的x坐标 int nYSrc, //源图形的左上角的x坐标 System.Int32 dwRop //光栅操作代码 ); private void button1_Click(object sender, System.EventArgs e) { Graphics g1 = this.CreateGraphics();//获得窗体图形对象 Image MyImage = new Bitmap(this.ClientRectangle.Width, this.ClientRectangle.Height, g1); Graphics g2 = Graphics.FromImage(MyImage);//创建位图图形对象 IntPtr dc1 = g1.GetHdc();//获得窗体的上下文设备 IntPtr dc2 = g2.GetHdc();//获得位图文件的上下文设备 BitBlt(dc2, 0, 0, this.ClientRectangle.Width, this.ClientRectangle.Height, dc1, 0, 0, 13369376);//写入到位图 g1.ReleaseHdc(dc1);//释放窗体的上下文设备 g2.ReleaseHdc(dc2);//释放位图文件的上下文设备 MyImage.Save(@"c:\Captured.jpg", ImageFormat.Jpeg);//保存为jpeg文件 MessageBox.Show("保存图片结束!"); } /// /// The main entry point for the application. /// [STAThread] static void Main() { Application.Run(new Form1()); } } } (出处:eNet硅谷动力) |
温馨提示:喜欢本站的话,请收藏一下本站!
本站发布的Win7纯净版系统、Win10纯净版和XP纯净版系统仅为个人学习测试使用,请在下载后24小时内删除,不得用于任何商业用途,否则后果自负,请支持购买微软正版软件!
本站所有资源全部来自于网络资源,如侵犯到您的权益,请及时通知我们(),我们会及时处理.
Copyright © 2018-2020 萝卜系统下载站 手机站 关于本站
